Friday, May 28, 2010

Google Maps: Dynamically Drawn and Resizable Polygon Overlay

In extension to my previous post on Dynamically Movable and Resizable Circle Overlay, I created yet another nifty tool to dynamically draw a polygon overlay on Google Maps. You won’t find another robust tool like this for Polygon drawing on the internet. Users can draw polygon dynamically by adding, deleting and moving the polygon boundary nodes. User can press shift+click on the map to add a new node to polygon boundary or they can press ctrl+click on any node marker to remove it. The node markers can be dragged around to resize the polygon.

This is how it looks like in action:
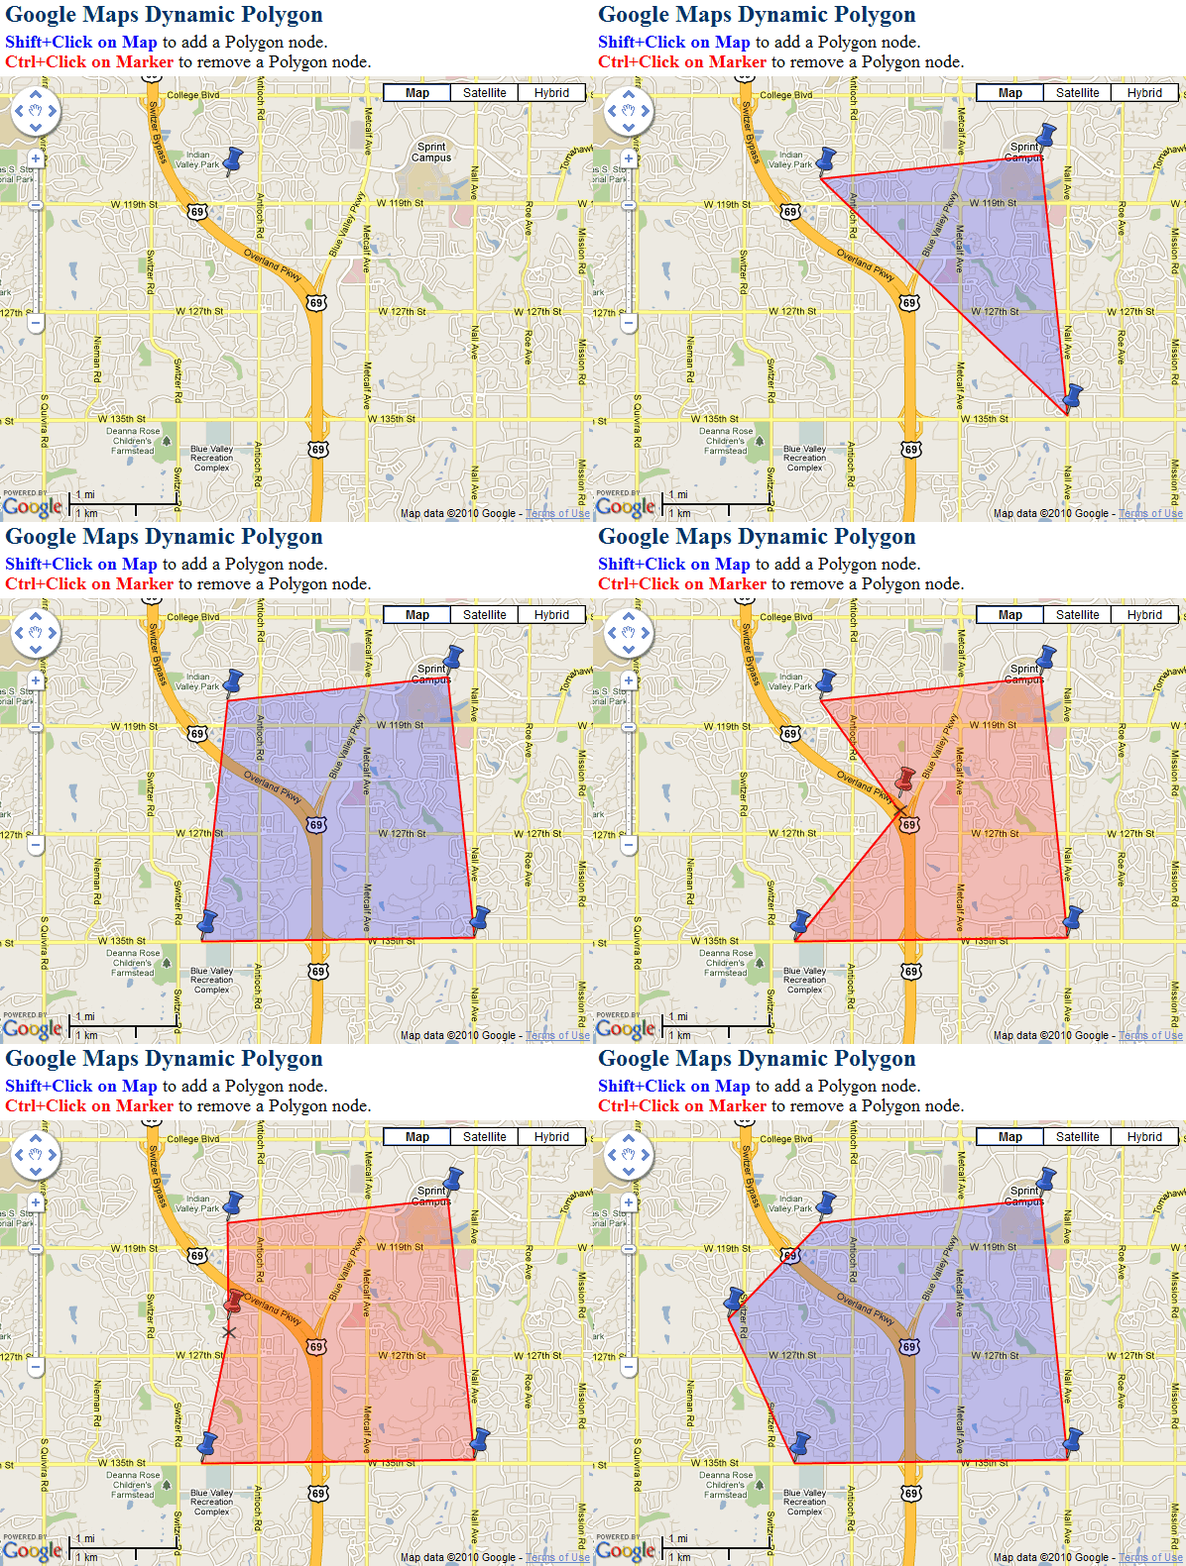
Google Maps Dynamic Polygon

The JavaScript code is pretty easy to modify for your custom needs. The initialize() function is used to initialize the Google Map object when the page loads. A click event is also added to the map for adding node markers on the map. The click event takes care of the case when the user click on the previous markers while holding the shift key. When the user clicks on the map, addMarker() function is called to add another boundary node to the polygon. For every newly added marker, drag events are assigned for resizing the polygon and a click event is assigned to delete the node when ctrl key is pressed while clicking the marker pin. The fitPolygon() function is used to set map bounds and center to adjust the polygon inside it.

Put the following JavaScript code in the head section of your page:

<script src="http://maps.google.com/maps?file=api&amp;v=2&amp;key=YOUR_API_KEY&sensor=true" type="text/javascript"></script>
<script type="text/javascript">
/* Developed by: Abhinay Rathore [web3o.blogspot.com] */ 
//Global variables
var global = this;
var map;

var PolygonMarkers = []; //Array for Map Markers
var PolygonPoints = []; //Array for Polygon Node Markers
var bounds = new GLatLngBounds; //Polygon Bounds
var Polygon; //Polygon overlay object
var polygon_resizing = false; //To track Polygon Resizing

//Polygon Marker/Node icons
var redpin = new GIcon(); //Red Pushpin Icon
redpin.image = "http://maps.google.com/mapfiles/ms/icons/red-pushpin.png";
redpin.iconSize = new GSize(32, 32);
redpin.iconAnchor = new GPoint(10, 32);
var bluepin = new GIcon(); //Blue Pushpin Icon
bluepin.image = "http://maps.google.com/mapfiles/ms/icons/blue-pushpin.png";
bluepin.iconSize = new GSize(32, 32);
bluepin.iconAnchor = new GPoint(10, 32);

function initialize() { //Initialize Google Map
    if (GBrowserIsCompatible()) {
        map = new GMap2(document.getElementById("map_canvas")); //New GMap object
        map.setCenter(new GLatLng(38.90, -94.68007), 13);

        var ui = new GMapUIOptions(); //Map UI options
        ui.maptypes = { normal:true, satellite:true, hybrid:true, physical:false }
        ui.zoom = {scrollwheel:true, doubleclick:true};
        ui.controls = { largemapcontrol3d:true, maptypecontrol:true, scalecontrol:true };
        map.setUI(ui); //Set Map UI options

        //Add Shift+Click event to add Polygon markers
        GEvent.addListener(map, "click", function(overlay, point, overlaypoint) {
            var p = (overlaypoint) ? overlaypoint : point;
            //Add polygon marker if overlay is not an existing marker and shift key is pressed
            if (global.shiftKey && !checkPolygonMarkers(overlay)) { addMarker(p); }
        });
    }
}

// Adds a new Polygon boundary marker
function addMarker(point) {
    var markerOptions = { icon: bluepin, draggable: true };
    var marker = new GMarker(point, markerOptions);
    PolygonMarkers.push(marker); //Add marker to PolygonMarkers array
    map.addOverlay(marker); //Add marker on the map
    GEvent.addListener(marker,'dragstart',function(){ //Add drag start event
        marker.setImage(redpin.image);
        polygon_resizing = true;
    });
    GEvent.addListener(marker,'drag',function(){ drawPolygon(); }); //Add drag event
    GEvent.addListener(marker,'dragend',function(){   //Add drag end event
        marker.setImage(bluepin.image);
        polygon_resizing = false;
        drawPolygon();
        fitPolygon();
    });
    GEvent.addListener(marker,'click',function(point) { //Add Ctrl+Click event to remove marker
        if (global.ctrlKey) { removeMarker(point); }
    });
    drawPolygon();

    //If more then 2 nodes then automatically fit the polygon
    if(PolygonMarkers.length > 2) fitPolygon();
}

// Removes a Polygon boundary marker
function removeMarker(point) {
    if(PolygonMarkers.length == 1){ //Only one marker in the array
        map.removeOverlay(PolygonMarkers[0]);
        map.removeOverlay(PolygonMarkers[0]);
        PolygonMarkers = [];
        if(Polygon){map.removeOverlay(Polygon)};
    }
      else //More then one marker
      {
        var RemoveIndex = -1;
        var Remove;
        //Search for clicked Marker in PolygonMarkers Array
        for(var m=0; m<PolygonMarkers.length; m++)
        {
            if(PolygonMarkers[m].getPoint().equals(point))
            {
                RemoveIndex = m; Remove = PolygonMarkers[m]
                break;
            }
        }
        //Shift Array elemeents to left
        for(var n=RemoveIndex; n<PolygonMarkers.length-1; n++)
        {
            PolygonMarkers[n] = PolygonMarkers[n+1];
        }
        PolygonMarkers.length = PolygonMarkers.length-1 //Decrease Array length by 1
        map.removeOverlay(Remove); //Remove Marker
        drawPolygon(); //Redraw Polygon
      }
}

//Draw Polygon from the PolygonMarkers Array
function drawPolygon()
{
    PolygonPoints.length=0;
    for(var m=0; m<PolygonMarkers.length; m++)
    {
        PolygonPoints.push(PolygonMarkers[m].getPoint()); //Add Markers to PolygonPoints node array
    }
    //Add first marker in the end to close the Polygon
    PolygonPoints.push(PolygonMarkers[0].getPoint());
    if(Polygon){ map.removeOverlay(Polygon); } //Remove existing Polygon from Map
    var fillColor = (polygon_resizing) ? 'red' : 'blue'; //Set Polygon Fill Color
    Polygon = new GPolygon(PolygonPoints, '#FF0000', 2, 1, fillColor, 0.2); //New GPolygon object
    map.addOverlay(Polygon); //Add Polygon to the Map

    //TO DO: Function Call triggered after Polygon is drawn
}

//Fits the Map to Polygon bounds
function fitPolygon(){
    bounds = Polygon.getBounds();
    map.setCenter(bounds.getCenter(), map.getBoundsZoomLevel(bounds));
}
//check is the marker is a polygon boundary marker
function checkPolygonMarkers(marker) {
    var flag = false;
    for (var m = 0; m < PolygonMarkers.length; m++) {
        if (marker == PolygonMarkers[m])
        { flag = true; break; }
    }
    return flag;
}

//////////////////[ Key down event handler ]/////////////////////
//Event handler class to attach events
var EventUtil = {
      addHandler: function(element, type, handler){
            if (element.addEventListener){
                    element.addEventListener(type, handler, false);
            } else if (element.attachEvent){
                    element.attachEvent("on" + type, handler);
            } else {
                    element["on" + type] = handler;
            }
      }
};

// Attach Key down/up events to document
EventUtil.addHandler(document, "keydown", function(event){keyDownHandler(event)});
EventUtil.addHandler(document, "keyup", function(event){keyUpHandler(event)});

//Checks for shift and Ctrl key press
function keyDownHandler(e)
{
      if (!e) var e = window.event;
      var target = (!e.target) ? e.srcElement : e.target;
      if (e.keyCode == 16 && !global.shiftKey) { //Shift Key
            global.shiftKey = true;
      }
      if (e.keyCode == 17 && !global.ctrlKey) { //Ctrl Key
            global.ctrlKey = true;
      }
}
//Checks for shift and Ctrl key release
function keyUpHandler(e){
      if (!e) var e = window.event;
      if (e.keyCode == 16 && global.shiftKey) { //Shift Key
            global.shiftKey = false;
      }
      if (e.keyCode == 17 && global.ctrlKey) { //Ctrl Key
            global.ctrlKey = false;
      }
}
</script>

To initialize the map you can call the functions on page load event and include a div tag inside your body to hold the Map.

<body onload="initialize()" onunload="GUnload()">
<div id="map_canvas" style="width:100%; height:450px"></div>
</body>

Feel free to modify and use this code on your website. I have used API v2 for my code but you can easily modify this code for API v3. Happy Mapping!

Thursday, May 27, 2010

Google Maps: Dynamically Movable and Resizable Circle Overlay

Google provides a pretty wholesome Map API for creating customized maps with enhanced features. In a recent project of mine I had to use dynamically drawn map overlays for searching house properties within them. To implement that I looked for some algorithms to draw circles on Google Map Overlays and found a good one at http://koti.mbnet.fi/ojalesa/googlepages/circle.htm, but this program was built to change the radius using html form field. To take it a few steps further, I planned to make this circle movable and resizable by directly dragging map icons.

      This is one of the best dynamic circle overlay drawing tool you can find on internet. There are two pin markers to alter the circle, the Blue pin is used to drag the circle around on the map and the Red one can be dragged to resize the circle. You can even set minimum and maximum radius for the circle in the JavaScript code. The resize marker pin always stays at the 0 degree edge of the circle. The Circle fill color changes to red if the circle is moved or resized.

This is how it looks like in action: 

Google Map Dynamic Circle

JavaScript code: The logistic code is pretty easy to modify for your custom needs. The initialize() function is used to initialize the Google Map object when the page loads. Circle Center and Resize markers are then added at the default center location. Marker drag events are assigned to Center and Resize markers for dragging and resizing the circle. The drawCircle() function implements the algorithm for drawing the circle and finally the fitCircle() function is used to set the Map bounds to include the full circle inside it. If you want to trigger any other function after the circle is drawn, you can call your function after the fitCircle() function call at the end of drawCircle() function. Google Map uses Metric Units for distance by default, you will have to use conversion factor (1km = 0.621371192mi) to convert radius value into miles if you wish to.

Place the following JavaScript code in the head section of your page:
<script src="http://maps.google.com/maps?file=api&amp;v=2&amp;key=YOUR_API_KEY&sensor=true" type="text/javascript"></script>
<script type="text/javascript">
/* Developed by: Abhinay Rathore [web3o.blogspot.com] */
//Global variables
var map;
var bounds = new GLatLngBounds; //Circle Bounds
var map_center = new GLatLng(38.903843, -94.680096);

var Circle; //Circle object
var CirclePoints = []; //Circle drawing points
var CircleCenterMarker, CircleResizeMarker;
var circle_moving = false; //To track Circle moving
var circle_resizing = false; //To track Circle resizing
var radius = 1; //1 km
var min_radius = 0.5; //0.5km
var max_radius = 5; //5km

//Circle Marker/Node icons
var redpin = new GIcon(); //Red Pushpin Icon
redpin.image = "http://maps.google.com/mapfiles/ms/icons/red-pushpin.png";
redpin.iconSize = new GSize(32, 32);
redpin.iconAnchor = new GPoint(10, 32);
var bluepin = new GIcon(); //Blue Pushpin Icon
bluepin.image = "http://maps.google.com/mapfiles/ms/icons/blue-pushpin.png";
bluepin.iconSize = new GSize(32, 32);
bluepin.iconAnchor = new GPoint(10, 32);

function initialize() { //Initialize Google Map
    if (GBrowserIsCompatible()) {
        map = new GMap2(document.getElementById("map_canvas")); //New GMap object
        map.setCenter(map_center);

        var ui = new GMapUIOptions(); //Map UI options
        ui.maptypes = { normal:true, satellite:true, hybrid:true, physical:false }
        ui.zoom = {scrollwheel:true, doubleclick:true};
        ui.controls = { largemapcontrol3d:true, maptypecontrol:true, scalecontrol:true };
        map.setUI(ui); //Set Map UI options

        addCircleCenterMarker(map_center);
        addCircleResizeMarker(map_center);
        drawCircle(map_center, radius);
    }
}

// Adds Circle Center marker
function addCircleCenterMarker(point) {
    var markerOptions = { icon: bluepin, draggable: true };
    CircleCenterMarker = new GMarker(point, markerOptions);
    map.addOverlay(CircleCenterMarker); //Add marker on the map
    GEvent.addListener(CircleCenterMarker, 'dragstart', function() { //Add drag start event
        circle_moving = true;
    });
    GEvent.addListener(CircleCenterMarker, 'drag', function(point) { //Add drag event
        drawCircle(point, radius);
    });
    GEvent.addListener(CircleCenterMarker, 'dragend', function(point) { //Add drag end event
        circle_moving = false;
        drawCircle(point, radius);
    });
}

// Adds Circle Resize marker
function addCircleResizeMarker(point) {
    var resize_icon = new GIcon(redpin);
    resize_icon.maxHeight = 0;
    var markerOptions = { icon: resize_icon, draggable: true };
    CircleResizeMarker = new GMarker(point, markerOptions);
    map.addOverlay(CircleResizeMarker); //Add marker on the map
    GEvent.addListener(CircleResizeMarker, 'dragstart', function() { //Add drag start event
        circle_resizing = true;
    });
    GEvent.addListener(CircleResizeMarker, 'drag', function(point) { //Add drag event
        var new_point = new GLatLng(map_center.lat(), point.lng()); //to keep resize marker on horizontal line
        var new_radius = new_point.distanceFrom(map_center) / 1000; //calculate new radius
        if (new_radius < min_radius) new_radius = min_radius;
        if (new_radius > max_radius) new_radius = max_radius;
        drawCircle(map_center, new_radius);
    });
    GEvent.addListener(CircleResizeMarker, 'dragend', function(point) { //Add drag end event
        circle_resizing = false;
        var new_point = new GLatLng(map_center.lat(), point.lng()); //to keep resize marker on horizontal line
        var new_radius = new_point.distanceFrom(map_center) / 1000; //calculate new radius
        if (new_radius < min_radius) new_radius = min_radius;
        if (new_radius > max_radius) new_radius = max_radius;
        drawCircle(map_center, new_radius);
    });
}

//Draw Circle with given radius and center
function drawCircle(center, new_radius) {
    //Circle Drawing Algorithm from: http://koti.mbnet.fi/ojalesa/googlepages/circle.htm

    //Number of nodes to form the circle
    var nodes = new_radius * 40;
    if(new_radius < 1) nodes = 40;

    //calculating km/degree
    var latConv = center.distanceFrom(new GLatLng(center.lat() + 0.1, center.lng())) / 100;
    var lngConv = center.distanceFrom(new GLatLng(center.lat(), center.lng() + 0.1)) / 100;

    CirclePoints = [];
    var step = parseInt(360 / nodes) || 10;
    var counter = 0;
    for (var i = 0; i <= 360; i += step) {
        var cLat = center.lat() + (new_radius / latConv * Math.cos(i * Math.PI / 180));
        var cLng = center.lng() + (new_radius / lngConv * Math.sin(i * Math.PI / 180));
        var point = new GLatLng(cLat, cLng);
        CirclePoints.push(point);
        counter++;
    }
    CircleResizeMarker.setLatLng(CirclePoints[Math.floor(counter / 4)]); //place circle resize marker
    CirclePoints.push(CirclePoints[0]); //close the circle polygon
    if (Circle) { map.removeOverlay(Circle); } //Remove existing Circle from Map
    var fillColor = (circle_resizing || circle_moving) ? 'red' : 'blue'; //Set Circle Fill Color
    Circle = new GPolygon(CirclePoints, '#FF0000', 2, 1, fillColor, 0.2); //New GPolygon object for Circle
    map.addOverlay(Circle); //Add Circle Overlay on the Map
    radius = new_radius; //Set global radius
    map_center = center; //Set global map_center
    if (!circle_resizing && !circle_moving) { //Fit the circle if it is nor moving or resizing
        fitCircle();
        //Circle drawing complete trigger function goes here

    }
}

//Fits the Map to Circle bounds
function fitCircle() {
    bounds = Circle.getBounds();
    map.setCenter(bounds.getCenter(), map.getBoundsZoomLevel(bounds));
}
</script>

To initialize the map you can call the functions on page load event and include a div tag inside your body to hold the Map.

<body onload="initialize()" onunload="GUnload()">
<div id="map_canvas" style="width:100%; height:450px"></div>
</body>

Feel free to modify and use this code on your website. I have used API v2 for my code but you can easily modify this code for API v3. Happy Mapping!

Wednesday, March 24, 2010

JavaScript and jQuery Image Magnifier

In an alternate version to the Image Magnification tool from my previous post, I have created another magnification tool which works exactly like a magnification glass moving over the picture. This tool is more concise and easy to use then the previous one where a separate popup with the same aspect ratio was used to display the image. Here the magnified image section keeps moving with the mouse providing an exact magnification glass effect. You also don’t need any separate CSS for the magnification window.

Why should you use this Image Magnification tool:

  1. Zero coding required.
  2. No CSS required at all.
  3. Can be triggered automatically or manually from the image.
  4. Works on images of any resolution or aspect ratio.

For testing I have used a very high resolution image of Taj Mahal (4300x2724 pixels).

This is how it looks in action:JavaScript Image MagnifierThe JavaScript code is very easy to understand and modify. The only thing you will need to modify for automatic magnification functionality is the $(document).ready() function where the jQuery Selectors needs to be modified to point to the images in your HTML document. You can also change the magnifier window size by changing the magnifier_size variable in the JavaScript Code.

Place the following JavaScript Code in the head section of your HTML page:
<script type="text/javascript"  src="http://code.jquery.com/jquery-latest.js"></script> 
<script type="text/javascript">
/* Developed by: Abhinay Rathore [web3o.blogspot.com] */
$(document).ready(function(){
      $(".magnify").mousemove(function(event){ moveMagnifier(this, event); });
      $(".magnify").mouseout(function(event){ hideMagnifier(); });
});

var magnifier_size = 200; //Change Magnifier size here.
var cursor_offset = 10; //Change Cursor Offset here.
var ratio, mHalf, pic_offset;
function showMagnifier(picId, e){ //Show Magnifier
      hideMagnifier();
      //Create and add magnified image to the body
      var magnifier = document.createElement("img");
      magnifier.id = "magnifier"
      magnifier.src = picId.src;
      magnifier.style.position = "absolute";
      document.body.appendChild(magnifier);
      //Calculate size ratio of original and magnified images
      ratio = magnifier.width / $(picId).width();
      mHalf = magnifier_size / 2;
      pic_offset = $(picId).offset(); //Picture offset
      //Get mouse position on the image
      var picX = e.pageX - pic_offset.left;
      var picY = e.pageY - pic_offset.top;
      clipImage(magnifier, picX, picY); //Clip the magnified image
      //Position the magnified image next to mouse cursor
      positionImage(magnifier, picX, picY, e.pageX, e.pageY)
}
function moveMagnifier(picId, e){ //Move Magnifier
      var magnifier = document.getElementById("magnifier");
      if(magnifier){ //If magnified image exists...
            //Get mouse position on the image
            var picX = e.pageX - pic_offset.left;
            var picY = e.pageY - pic_offset.top;
            clipImage(magnifier, picX, picY); //Clip the magnified image
            //Position the magnified image next to mouse cursor
            positionImage(magnifier, picX, picY, e.pageX, e.pageY)
      } else { //If magnified image does not exist...
            showMagnifier(picId, e);
      }
}
function clipImage(magnifier, picX, picY){ //Clip magnified image...
      var centerX = picX * ratio;
      var centerY = picY * ratio;
      $(magnifier).css("clip", "rect(" + Math.round(centerY - mHalf)  + "px," +
                                                   Math.round(centerX + mHalf) + "px," +
                                                   Math.round(centerY + mHalf) + "px," +
                                                   Math.round(centerX - mHalf) + "px)");
}
function positionImage(magnifier, picX, picY, pageX, pageY){  //Position magnified image...
      $(magnifier).css({'top': pageY - (picY * ratio) + mHalf + cursor_offset,
                         'left': pageX - (picX * ratio) + mHalf + cursor_offset});
}
function hideMagnifier(){ //Hide Magnifier
      $("#magnifier").remove(); //Remove the Magnifier Image
}
</script>

The CSS code I have used here is only to display the original images on the HTML page. You can use you own CSS styles and use the image class in the jQuery Selectors. You actually don’t need any CSS code to use this tool. You can use it directly by assigning mouse events to your images manually.
<style type="text/css">
.magnify{
      width: 500px;
      height: auto;
      cursor: crosshair;
}
</style>

The HTML Code for this image magnifier is very simple to use. If you are using CSS layout then you can use jQuery Selectors to select the images automatically.
<img class="magnify" src="taj.jpg" />

If you want to assign Magnification feature to your images manually, you can add mouse events to your images as shows below: 
<img src="taj.jpg" style="width:500px" onmousemove="moveMagnifier(this, event)" onmouseout="hideMagnifier()" />

Thursday, March 18, 2010

Dynamic Popup Image Zoom with Magnifying Glass Effect using jQuery

Lot of times on your webpage you might want to include an image of a very large resolution but the users then have to open that image in a new window to view its details in actual resolution. In situations like that, comes in handy some kind of image zoom tool which can display the actual image resolution/details just by hovering your mouse over that. These kind of image popup zoom boxes can be seen on some merchant websites where they don’t want the customers to navigate away from their product page.

      I have implemented a very easy to use image zoom tool where the popup appears just next to the image and the zoomed image pans based upon the mouse position on the original image giving the magnifying glass effect. This tool works with images of any resolution and aspect ratio. The zoom popup box width can be adjusted using the JavaScript and the height is automatically adjusted as per the aspect ratio of the original image.

Why should you use this image zoom tool:

  1. Zero coding required.
  2. No strict HTML layout/structure needed to place the images in the document.
  3. Works with images of any resolution and aspect ratio.
  4. Just by modifying the jQuery selectors in $(document).ready() function you can assign zoom property to the images on your page. For example: to assign zoom effect to all the images on your page, just use $("img").mouseover() selector.
  5. Zoom area width can be easily adjusted using the JavaScript zoom_width variable and the height is adjusted automatically based upon the image aspect ratio.
  6. There is not need to have a separate thumbnail for the images to be zoomed.

Here are a few examples of how the zooming looks like:Dynamic Popup Image Zoom with Magnifying Glass Effect Dynamic Popup Image Zoom with Magnifying Glass EffectDynamic Popup Image Zoom with Magnifying Glass Effect

The JavaScript code is very easy to incorporate and robust enough to handle any kind/size of images. You can use your own CSS/HTML to place the pictures in your document. When the page loads for the first time, the $(document).ready() function assigns mouse events to the pictures you want to zoom. You just need to change the jQuery selectors in the $(document).ready() function to select the images to zoom if you have a different CSS/HTML layout on your page.

      The showZoom() function is triggered when the user moves the mouse over the image. showZoom() creates the zoom box with the image of actual resolution inside it and calculates the margin ratios required for panning the zoomed image. The moveZoom() function is then used the keep track of the mouse position on the actual image and pan the image in zoom box based upon the mouse position on the actual image (Magnifying Glass Effect). hideZoom() removes the zoom box and its child elements when the user moves the mouse out of the image thumbnail.

JavaScript Code:
<script type="text/javascript"  src="http://code.jquery.com/jquery-latest.js"></script> 
<script type="text/javascript">
/* Developed by: Abhinay Rathore [web3o.blogspot.com] */
$(document).ready(function(){
      $(".pic_zoom > img").mouseover(function(){ showZoom(this); });
      $(".pic_zoom > img").mousemove(function(event){ moveZoom(this, event); });
      $(".pic_zoom > img").mouseout(function(){ hideZoom(); });
});
var zoom_width = 500; //Change zoom area width here
var zoom_left_ratio, zoom_top_ratio;
function showZoom(picId){ //Show Zoom window 
      hideZoom();

      //Create and add zoom div (with image) to the body
      var zoom = document.createElement("div");
      zoom.id = "zoom";
      var img = document.createElement("img");
      img.src = picId.src;
      zoom.appendChild(img);
      document.body.appendChild(zoom);
      //Set zoom div height proportionally to the width specified above.
      var offset = $(picId).offset();
      $(zoom).width(zoom_width);
      $(zoom).height(Math.round($(zoom).width() * $(picId).height() / $(picId).width()));
      $(zoom).css({'top': offset.top, 'left': offset.left + $(picId).width() + 10});
      //Calculate zoom ratio
      zoom_left_ratio = ($(img).width() - $(zoom).width()) / $(picId).width();
      zoom_top_ratio = ($(img).height() - $(zoom).height()) / $(picId).height();
}
function moveZoom(picId, e){ //Move Zoom image
    var zoomed_img = $("#zoom > img");
    var zoom = $("#zoom");
    var pic_offset = $(picId).offset();
    //Get mouse position on the image
    var picX = e.pageX - pic_offset.left;
    var picY = e.pageY - pic_offset.top;
    //Calculate margins for the zoomed image
    var leftMargin = -1 * Math.round(picX * zoom_left_ratio);
    var topMargin = -1 * Math.round(picY * zoom_top_ratio);
    //Ser margins for the zoomed image
    zoomed_img.css('left', (leftMargin > 0) ? 0 : leftMargin);
    zoomed_img.css('top', (topMargin > 0) ? 0 : topMargin);
}
function hideZoom(){ //Hide Zoom window
      //Remove the zoom div and its children from the body
      $("#zoom").children().remove();
      $("#zoom").remove();
}
</script>

A very minimal amount of CSS code is used to define the div tag holding the images and the properties for the zoom box. If you use your personalized CSS, then there is no need to modify the zoom box properties.

CSS Code:
<style type="text/css">
.pic_zoom {
      border: 1px solid #9CF;
      width: 210px;
}
.pic_zoom img{
      width: 200px;
      height: auto;
      margin: 5px;
      cursor: crosshair;
}
#zoom {
      position: absolute;
      border: 1px solid #9CF;
      overflow: hidden;
}
#zoom img{
      position: absolute;
}
</style>

The HTML code can be modified very easily based upon the layout and style of your HTML document. you can use your own containers or place the images directly on the document. For any modifications in the CSS/HTML layout, the jQuery selectors in the $(document).ready() function needs to be modified to assign the mouse events to the images for zooming them.

HTML Code:
<div class="pic_zoom">
    <img src="WaterLilies.jpg" />
    <img src="goldengate.jpg" />
    <img src="city.jpg" />
</div>